 OpenClaw Deployment Assistant User Guide
From installation to familiarization, we help you quickly master all the
features of the OpenClaw Deployment Assistant.
Whether you're a tech newbie or a developer, this tutorial
makes it easy for you to get started.
Product introduction
Learn what the OpenClaw Deployment Assistant is and what it can do for you
OpenClaw Deployment Assistant is a cross-platform one-click deployment tool for individual users. Through automated workflows and intelligent setup wizards, it helps you overcome the technical barriers of manual deployment and quickly run OpenClaw on your own computer.
Core Features
- One-click deployment — automatic environment detection, dependency installation, and complete deployment in about 3 minutes
- Multi-model support — connect to mainstream AI services such as Zhipu GLM, Tongyi Qianwen, DeepSeek, and Doubao
- Data privacy — fully local deployment with no data uploaded to the cloud
- Cross-platform — supports Windows, macOS, and Linux
- Intelligent conversation — built-in chat interface so you can talk with AI anytime
- Real-time monitoring — CPU, memory, and disk usage at a glance
Technical architecture: Built with native Rust, the installer stays lightweight, uses minimal resources, and starts quickly.
Get started quickly
Start using the OpenClaw Deployment Assistant in under 3 minutes
-
Download and install the OpenClaw Deployment Assistant
Go to the official download page, choose the installer for your operating system, and double-click to install. Supports Windows 10+, macOS 11+, and Ubuntu 20.04+.
-
Launch the app and activate your membership
When first launched, the app automatically obtains a unique device code and checks membership status. If you want to buy a membership, you can complete the payment directly within the app (supports WeChat/Alipay).
-
Configure AI models
On the "AI Model" page, select your AI service provider, enter the API Key, and save it. For first-time users, we recommend starting with Zhipu GLM because some models offer free individual quotas.
-
Start the service and start a conversation
Click “Start Service” on the home control panel. After waiting for the service to be ready, click “Open Chat” to talk to the AI assistant.
Congrats! Once you finish the steps above, your AI personal assistant is ready to work for you around the clock.
Download and install
Detailed download and installation instructions
system requirements
| operating system | Minimum version | disk space | RAM |
|---|---|---|---|
| Windows | Windows 10 (1809+) | ≥ 500 MB | ≥ 4 GB |
| macOS | macOS 11 Big Sur | ≥ 500 MB | ≥ 4 GB |
| Linux | Ubuntu 20.04 / Equivalent | ≥ 500 MB | ≥ 4 GB |
Installation steps
Windows:
- Download .exe installation file 安装文件
- Double click to run the installer and follow the prompts to complete the installation
- Find the OpenClaw Deployment Assistant icon on the desktop or start menu and double-click to launch
macOS:
- Download the .dmg installation file 安装文件
- Double click Open and drag the OpenClaw Deployment Assistant into the Applications folder
- If you see a security prompt when running for the first time, go to “System Settings → Privacy and Security” to allow it to be opened
Linux:
- Download a .deb or .appImage file 或
.AppImage文件 - Use dpkg -i or run AppImage directly 或直接运行 AppImage
Note for macOS users: The first time you open it may be blocked due to security policies. Please go to “System Settings → Privacy & Security” and click “Still Open” to use it normally.
AI model configuration
Select an AI service provider and configure an API key
The OpenClaw Deployment Assistant supports the configuration of multiple mainstream AI model providers. You only need to register your own account and obtain an API Key to access and use them. Fees for AI model APIs are charged by each provider and are not related to the OpenClaw Deployment Assistant itself.
Supported AI service providers
🧠 OpenAI
Recommended model: GLM-5 / GLM-4-Flash:GPT-4o / GPT-4o-mini
API Address: https://dashscope.aliyuncs.com/compatible-mode/v1: https://api.openai.com/v1
☁️ Google Gemini
Recommended model: GLM-5 / GLM-4-Flash:gemini-2.0-flash
API Address: https://dashscope.aliyuncs.com/compatible-mode/v1: https://generativelanguage.googleapis.com/v1beta/openai
🎯 Anthropic Claude
Recommended model: GLM-5 / GLM-4-Flash:claude-sonnet-4
API Address: https://dashscope.aliyuncs.com/compatible-mode/v1: https://api.anthropic.com/v1
🔥 Mistral AI
Recommended model: GLM-5 / GLM-4-Flash:mistral-large / mistral-instruct
API Address: https://dashscope.aliyuncs.com/compatible-mode/v1: https://api.mistral.ai
Configuration steps
-
Choosing an AI Service Provider
On the "AI Model" page, click the AI service provider card you want to use. For first-time users, we recommend Google Gemini because it offers a free tier for personal use.
-
Register and get an API Key
Click “Don't have an account? Click the “Register” link. After registering on the corresponding platform, go to the API key management page to create an API Key and copy it.
-
Fill in the configuration and save
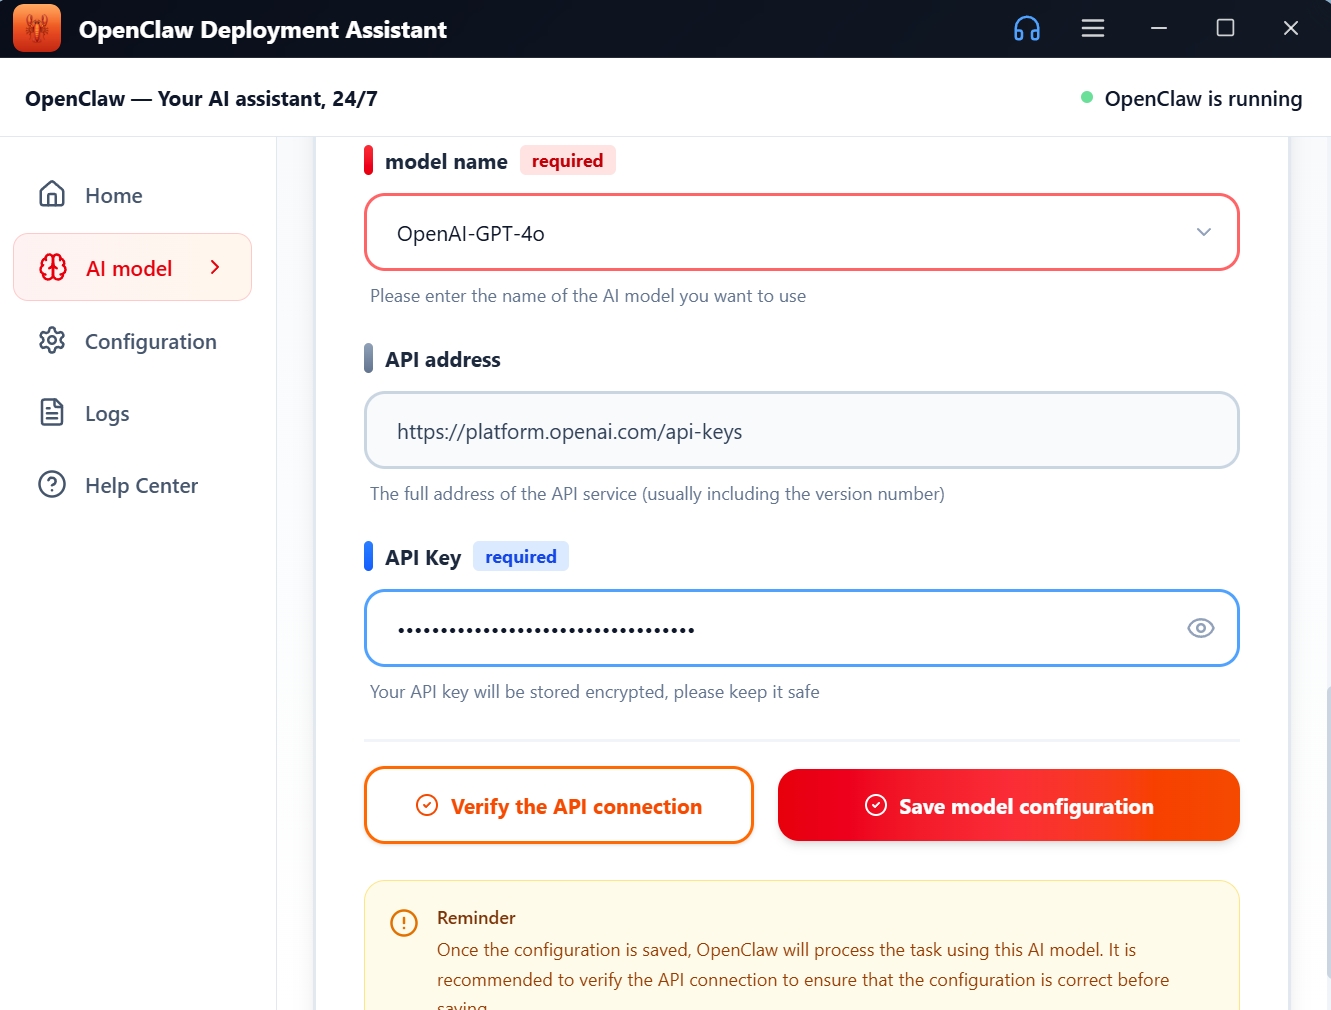
Paste the API Key into the “API Key” input box. The model name and API address are automatically filled in with default values, and no modification is required if there are no special requirements. Click “Verify API Connection” to confirm that the configuration is correct, then click “Save Model Configuration”.
Money saving tip: Google Gemini offers a generous free tier for everyday use. If you need more powerful capabilities, choose OpenAI GPT-4o or Anthropic Claude.
API Key security: Your API key will be stored encrypted locally and will not be uploaded to any server. Do not share your API Key with others.
How to obtain an API key
Take OpenAI as an example to teach you how to register an account and obtain an API Key
If you don't have an AI model platform account or API Key yet, don't worry. The following walkthrough demonstrates the general process for registering and obtaining an API Key. The steps are similar across providers.
Which provider should you choose? Google Gemini offers a free tier that is ideal for beginners. OpenAI GPT-4o provides industry-leading quality, and DeepSeek offers competitive pricing. Choose according to your needs.
-
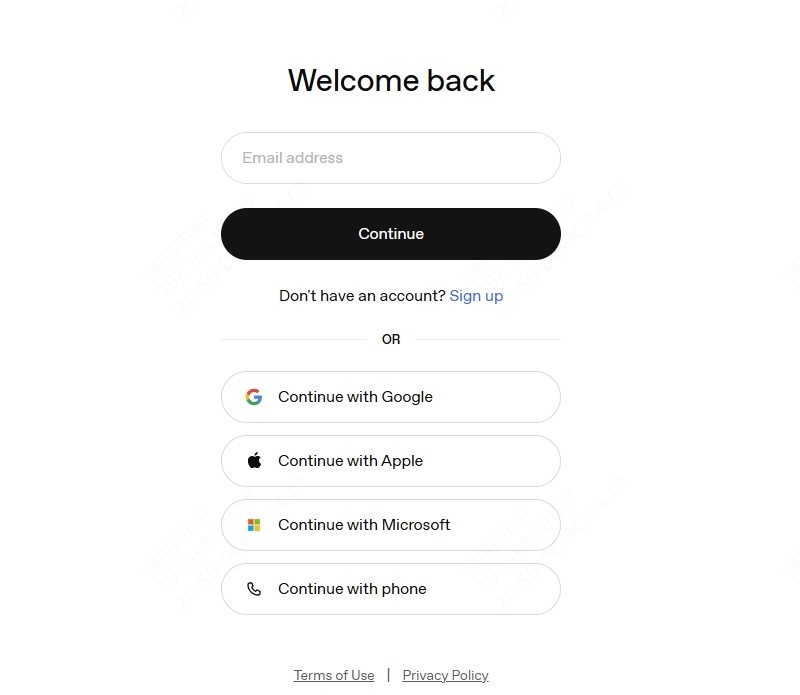
Open the AI provider's website
Visit your chosen AI provider's website (for example, OpenAI Platform) and click the "Sign Up" or "Login" button.

-
Register/Login
Register an account with your email address. Follow the prompts to verify your email and complete the registration process.
-
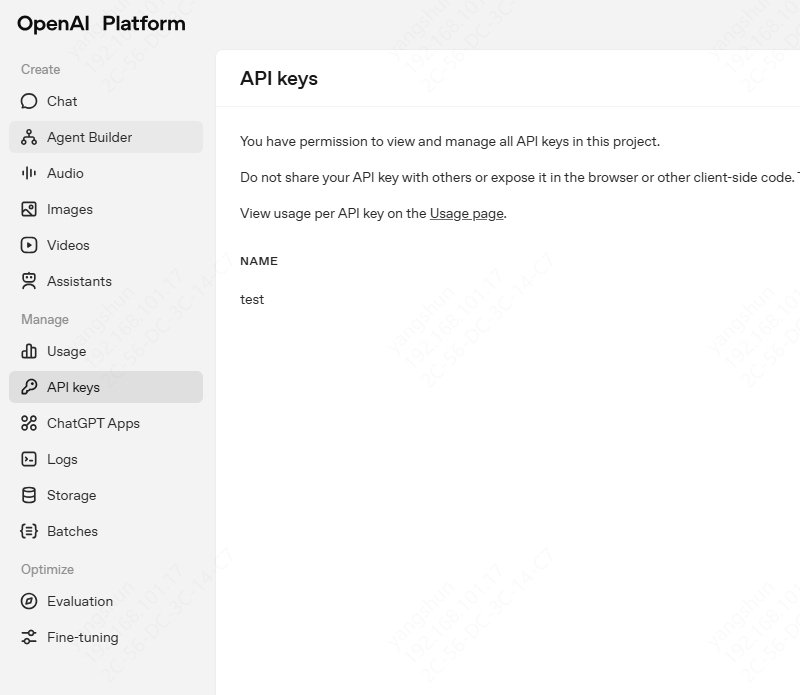
Go to the API Key management page
After logging in, go to the API Key management page (usually under Settings or your account menu) and create a new API Key.
-
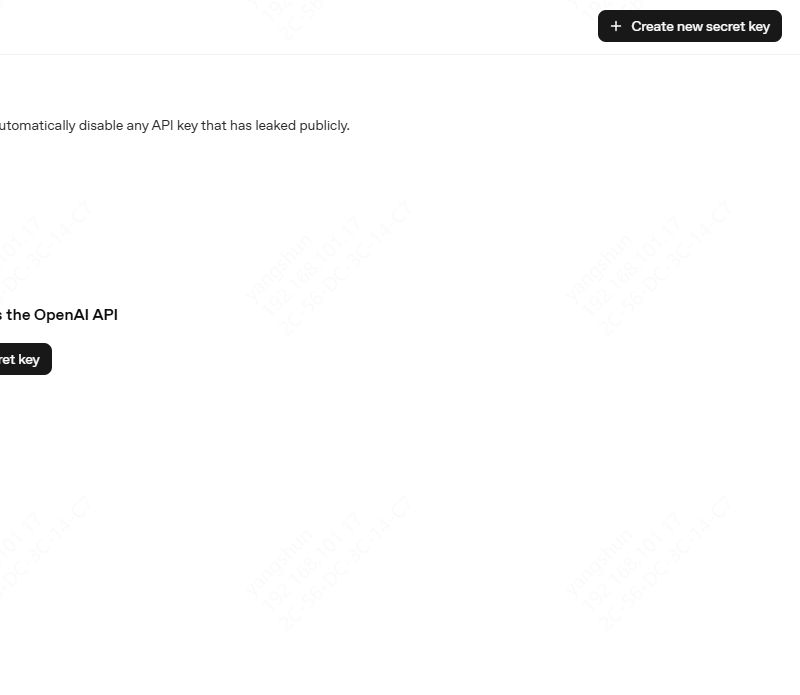
Adding a new API Key
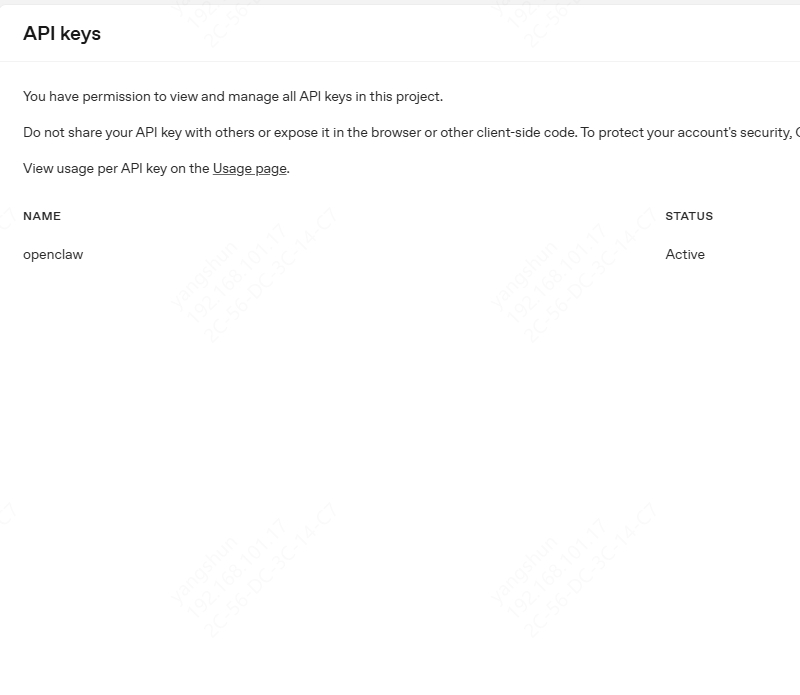
After entering the API Key management page, click the “Add New API Key” button in the upper-right corner.
-
Enter an API Key name
In the new API Key dialog, enter a name in the input box (for example:
openclaw) and click the “OK” button.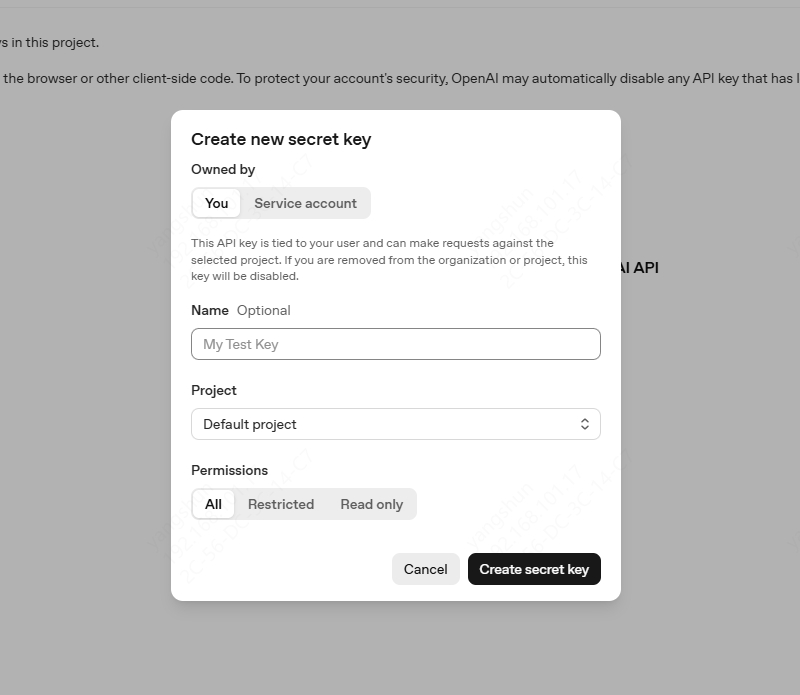
-
Copy API Key
Once created, an API Key named openclaw will appear in the list. Click the “Copy” button next to it to copy the API Key to your clipboard.
-
Configure an API Key in OpenClaw
Open the OpenClaw Deployment Assistant, go to the AI model configuration page, and paste the API Key you just copied into the API Key input box. After saving, the AI model API Key setup is complete.
Configuration interface in the deployment wizard:
AI model management page in the dashboard:
Congrats! Once the API Key is configured, you can start the Gateway service and begin using the AI assistant for intelligent conversations.
Security reminder: Keep your API Key safe. Do not share it with others or post it on public platforms. If the API Key is leaked, delete it and create a new one on your provider's platform as soon as possible.
Service management
Start, stop, and restart the OpenCLAW Gateway service
The OpenClaw Deployment Assistant forwards AI requests through the local Gateway service. Before using the chat feature, you need to start the Gateway service.
Basic operations
| Operation | Description | Usage scenarios |
|---|---|---|
| Start service | Start OpenClaw Gateway | First use or after service stops |
| Stop service | Close Gateway to release resources | Save resources when not in use |
| Restart service | Restart after stopping | Restart needed to apply changes after configuration |
How to operate
- Go to the “Home” control panel
- Check the service control card on the top left
- If the service is not running, click the “Start Service” button.
- When the service is running, click “Stop Service” or “Restart Service” in the lower-right corner.
- Status indicators: 🟢 Running | 🟡 Testing | ⚫ Stopped
Auto Detect: The app automatically checks the Gateway service status every 10 seconds, so no manual refresh is required.
Smart conversation
Communicate in natural language with AI assistants
Once the Gateway service has started, click the “Open Chat” button on the home page to begin a conversation with the AI assistant.
How to use
- Confirm that the home page status bar shows “OpenClaw is running”
- Click the “Open Chat” button to open a dedicated chat window
- Type your question or instructions in the input box
- The AI assistant will generate answers in real time
Conversation Skills
- Describe your needs as clearly and specifically as possible.
- Provide enough context to get more accurate answers.
- Use multi-turn conversations; the AI will remember the context.
- Try different ways of formulating questions to find the best interaction
If “Service not started” appears when you click “Open Chat”, please start the Gateway service on the home page first.
System monitoring
View system resource usage in real time
The bottom of the homepage shows a real-time system resource monitoring panel to help you understand the computer's operating status:
| Monitoring item | View system resource usage in real time | Refresh frequency |
|---|---|---|
| CPU Usage | Current CPU utilization percentage | Every 5s |
| Memory usage | Used memory / Total memory | Every 5s |
| Disk Space | Used disk / Total disk | Every 5s |
| Gateway Address | Local Gateway access URL | Real-time |
| Runtime | Runtime since this startup | Every 1s |
| Version Info | Installed OpenClaw version | At startup |
Click the “Refresh” button in the upper right corner of the System Resources panel to update the data manually.
Configuration
Customize the operating parameters of the OpenClaw Deployment Assistant
Click “Configuration Management” in the left navigation to enter the configuration page. You can adjust the following settings:
Basic configuration
- Installation path: OpenClaw installation directory
- Gateway port: local service listening port, default 18789
- Log level: Debug/Info/Warning/Error
Advanced Configurations
- Auto start: automatically launch the OpenClaw Deployment Assistant when the system boots.
- Debug mode: record detailed logs after activation to simplify troubleshooting.
- Automatic updates: detect and install the latest version.
After modifying the port, you need to restart the Gateway service for the change to take effect. You can click “Restart Service” on the home page.
Log Management
View and manage system operation logs
In the “Log Center”, you can view all system operation records and operation logs.
Function description
- Level filtering: filter logs by info, success, warning, and error.
- Keyword search: enter keywords to quickly locate specific logs.
- Clear logs: remove all historical log records with one click.
Log level description
| Level | Color | Description |
|---|---|---|
| INFO | 🔵 Blue | General information, such as operation records |
| SUCCESS | 🟢 Green | Operation successful, such as service start successful |
| WARNING | 🟠 Orange | Warning message, needs attention |
| ERROR | 🔴 Red | Error message, needs processing |
One-click deployment
Automate the deployment of OpenClaw to your computer
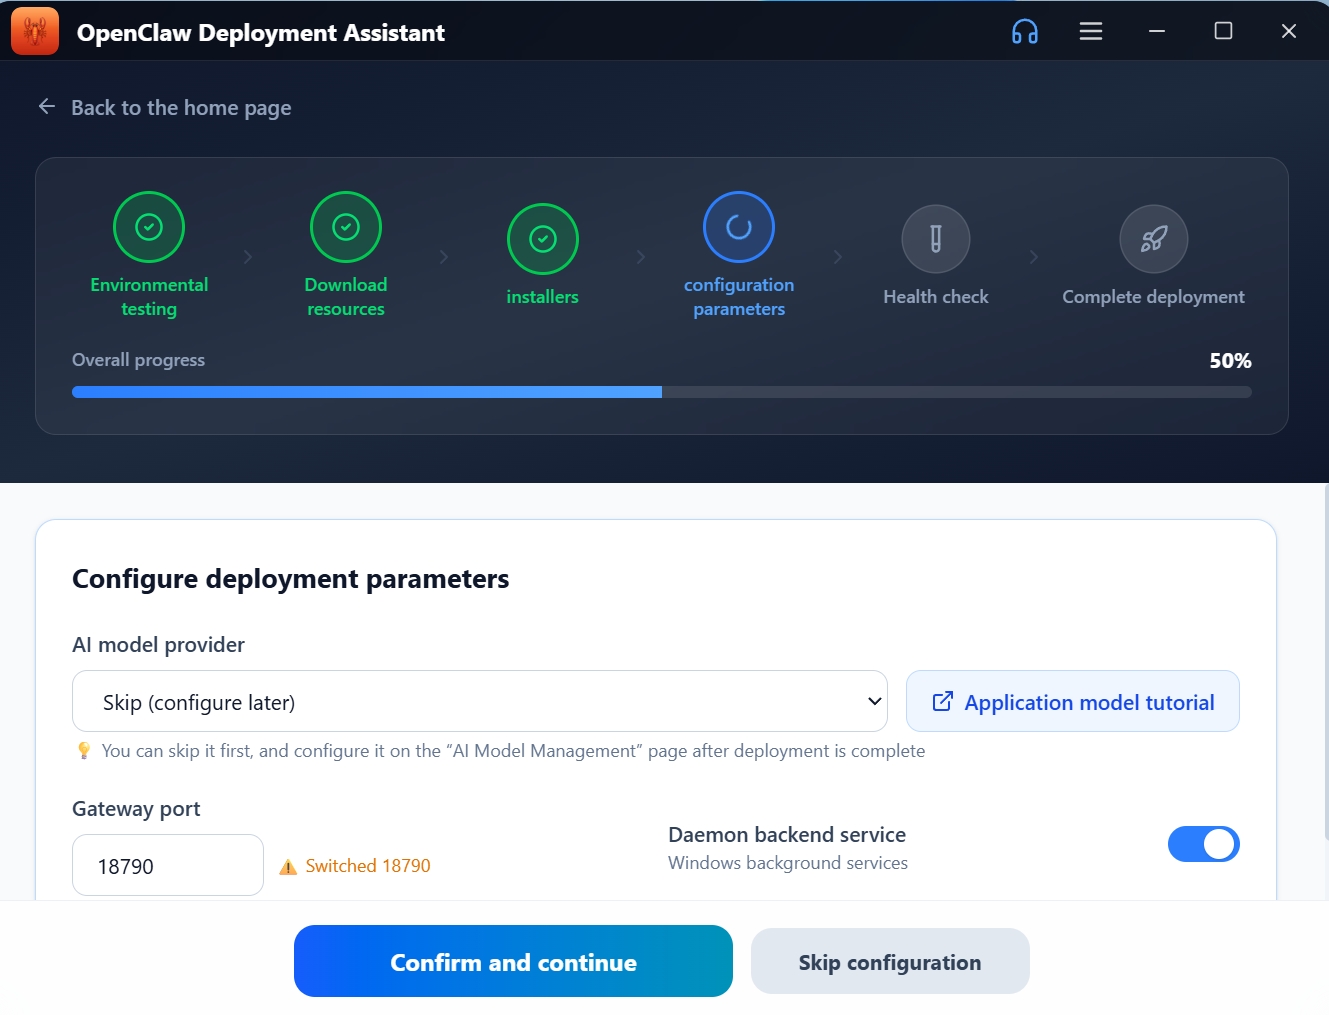
The deployment wizard will guide you through the automated deployment of OpenCLAW and address technical barriers that may be encountered during manual deployment. The entire process is divided into 6 steps:
-
Environment Check
Automatically detects the operating system version, disk space, internet connection, and necessary dependencies (Python, Git, etc.). If it's missing, an automatic installation will be attempted.
-
Select a working directory
Set the OpenCLAW installation path. The default is the user directory. Make sure the directory you select has enough disk space.
-
Choosing an AI Service
Select the AI large model service you want to use (OpenAI/Google Gemini/DeepSeek/Anthropic Claude, etc.).
-
Configure AI parameters
Fill in the configuration information such as the API key, model name, and API address, and click “Verify” to test the connection.
-
Download and deploy
Download the OpenCLAW core program through the acceleration channel, unzip it, and execute the initialization. This step requires an internet connection, and progress is displayed in real time.
-
Validate and complete
Automatically verify that the service is running properly and that the API connection is working properly. Once verified, you can start using it.
Deployment time: A full deployment usually takes 3-10 minutes, depending on network speed and system performance.
Member services
Learn about membership benefits and how to buy
Member Level
| Level | Function | Description |
|---|---|---|
| Free users | Can browse basic pages | Cannot use installation and deployment features |
| VIP Member | Full Installation, Deployment, and Usage | Single User, Single Machine License, Full Functionality Unlocked |
How to buy
- Click the hamburger menu ☰ on the right side of the title bar and choose “Open membership”.
- Choose the membership package that's right for you
- Use WeChat or Alipay to scan the QR code to pay
- Automatically activated after successful payment, no additional action required
No login required: Paid membership is tied to a device code, so you can purchase and use it without logging in. If you need cross-device management, you can log in and bind it to your account.
FAQs
Quickly find solutions to your problems
Please troubleshoot with the following steps:
- Check whether the port is occupied by another program (default 18789).
- Confirm OpenClaw is installed correctly and try redeploying if needed.
- Check the "Log Center" for detailed error messages.
- If the problem persists, contact customer service.
Contact customer service
NEED HELP? Contact us anytime
Email Support
- Email:support@pcgogo.com
- Working hours:Official working days 9:00-11:50 / 13:30-18:00 | Official holidays 10:00-22:00
- Friendly reminder:Please leave a message during non-business hours, and customer service will reply as soon as possible