
You've finished your work for the day, clicked the "Sleep" option on your Windows 10 PC, expecting it to power down gently into rest mode. But instead, nothing happens. Your screen stays on, the fans keep running, and you're left frustrated, wondering, "Why my PC won't go to sleep?" If you've been grappling with issues like "computer won't sleep," you're not alone. This common problem can disrupt your daily routine and even waste energy. In this blog, we'll dive into the reasons behind these sleep glitches and share effective solutions.

Common Reasons for PC Won't Go to Sleep
1. Running Programs and Processes
One of the most frequent culprits for "PC won't go to sleep" is background programs and processes that are still active. Some applications, especially those performing tasks like file downloads, updates, or data syncing, can prevent your PC from entering sleep mode. For example, if you have a cloud storage app in the background that's still uploading files, Windows may keep your system awake to ensure the task is completed. Even certain browser tabs with auto-playing videos or animations can interfere with the sleep function.
2. Outdated or Faulty Drivers
Device drivers play a crucial role in your PC's operation, and outdated or malfunctioning ones can cause sleep issues. Graphics drivers, network card drivers, and even USB device drivers can be the root cause. When these drivers don't communicate properly with the Windows 10 operating system, they can signal that the device they control (like a graphics card or network adapter) is still in use, preventing the "PC won't sleep" problem from being resolved.
3. Power Settings Misconfiguration
Windows 10 offers a range of power settings that you can customize. However, if these settings are misconfigured, it can lead to sleep glitches. Maybe you accidentally changed the settings so that your PC never sleeps, or the conditions for entering sleep mode are too restrictive. For instance, if you've set the sleep timer for a very long duration or disabled sleep mode for specific power sources (like when running on battery), it can cause confusion and result in your PC not going to sleep as expected.
4. Hardware Problems
Sometimes, the issue lies with the hardware itself. Faulty components such as a failing hard drive, a malfunctioning power supply unit, or even a damaged motherboard can disrupt the normal sleep process. A hard drive that's constantly accessing data due to errors might prevent the system from sleeping. Similarly, if the power supply isn't providing a stable power flow, it can cause your PC to stay awake or even crash when attempting to enter sleep mode.

5. Windows Updates and Bugs
New Windows updates are designed to improve performance and fix bugs, but sometimes they can introduce new problems. A bug in a recent update might interfere with the sleep function, leading to "PC won't sleep" issues. In some cases, an update might change your power settings without your knowledge, causing the sleep mode to stop working correctly.
Solutions to Fix PC Won't Go to Sleep
Solution 1: Close Background Programs and Processes
Open Task Manager: Press Ctrl + Shift + Esc simultaneously to open the Task Manager.
Identify and End Unnecessary Processes: In the "Processes" tab, look for any programs that are using significant system resources or are still actively running when they shouldn't be. For example, if you see a media player that you thought you closed or a software update utility that's finished its job, right-click on it and select "End Task".
Check for Browser Tabs: If you have a web browser open, make sure no tabs are playing videos, animations, or audio in the background. Close any unnecessary tabs. Then, try putting your PC to sleep again and see if the problem is resolved.
Solution 2: Update Your Drivers
Manual Update
Open Device Manager: You can do this by pressing the Windows key + X and selecting "Device Manager" from the menu.
Locate the Problematic Device: Expand the categories in Device Manager to find the device with the potentially outdated or faulty driver. For example, if you suspect a graphics driver issue, expand the "Display adapters" category.
Update the Driver: Right-click on the device and select "Update driver". You can choose to "Search automatically for updated driver software" if you want Windows to find the latest driver online, or "Browse my computer for driver software" if you've already downloaded the driver file. Follow the on-screen instructions to complete the update process.
Automatic Update
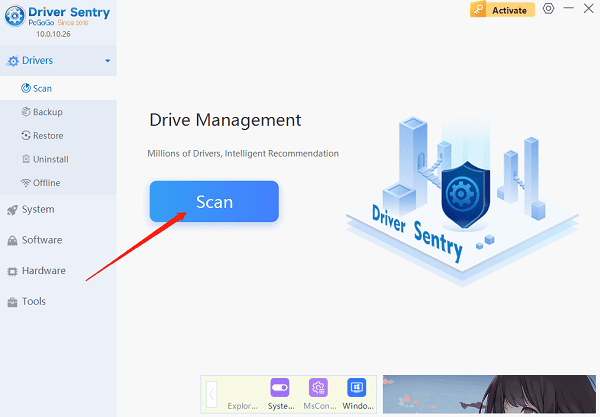
Updating drivers manually can be time-consuming and a bit tricky, especially if you're not tech-savvy. PcGoGo Driver Sentry is a great tool for that.
Download and Install PcGoGo Driver Sentry: Visit the official PcGoGo website and download the software. The installation is quick and easy; just follow the prompts.
Scan Your System: Open PcGoGo Driver Sentry and click the "Scan" button. The program will thoroughly scan your entire system to detect any outdated, missing, or corrupted drivers, including those that might be causing your PC's sleep problems.
Update Your Drivers: Once the scan is complete, you'll see a list of drivers that need updating. Click the "Update" button next to the relevant drivers. PcGoGo Driver Sentry will automatically download and install the latest and most compatible versions for you. This ensures that all your device drivers are up-to-date, reducing the likelihood of "computer won't sleep" issues caused by driver-related problems.
Solution 3: Check and Adjust Power Settings
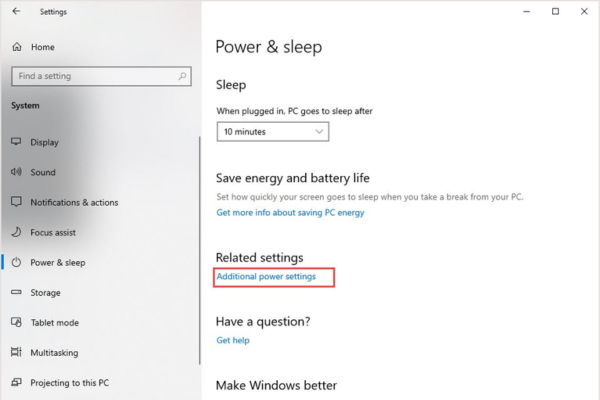
Open Power & Sleep Settings: You can do this by going to "Settings" (press Windows key + I) and clicking on "Power & Sleep".
Adjust Sleep Timer: Under the "Sleep" section, check the settings for when your PC should go to sleep. Make sure the timer is set to an appropriate duration for your needs. For example, if it's set to "Never," change it to a reasonable time like 10 minutes for when your PC is plugged in and 5 minutes for when it's on battery power.
Advanced Power Settings: Click on "Additional power settings" to access more detailed options. Here, you can customize settings for different hardware components, such as hard drives, display, and wireless adapters. Make sure these settings are configured correctly and aren't preventing your PC from sleeping.
Solution 4: Check for Hardware Issues
Run Hardware Diagnostics: Windows 10 has built-in diagnostic tools that you can use to check the health of your hardware. For example, you can run the "Memory Diagnostic" tool to check for problems with your RAM. Press the Windows key + R, type "mdsched.exe", and press Enter. Follow the instructions to start the diagnostic.
Inspect External Devices: Disconnect any external devices (like USB drives, printers, or external hard drives) and see if your PC can go to sleep. Sometimes, a malfunctioning external device can prevent sleep. If your PC sleeps after disconnecting the devices, there might be an issue with that particular device or its driver.
Seek Professional Help: If you suspect a more serious hardware problem, such as a failing hard drive or a damaged motherboard, it's best to consult a professional technician. They possess the tools and the specialized knowledge to precisely diagnose and resolve the problem.

Solution 5: Troubleshoot Windows Updates
Check for Update-Related Issues: Go to "Settings" > "Update & Security" > "Windows Update". Verify whether there are any recognized problems associated with the most recent updates. Microsoft sometimes publishes information about bugs and workarounds for update-related problems.
Uninstall Problematic Updates: If you suspect that a recent update is causing the sleep glitch, you can try uninstalling it. In the "Windows Update" section, click on "View update history" and then click "Uninstall updates". Select the update that you think might be causing the problem and click "Uninstall". After uninstalling, restart your PC and see if the sleep function works correctly.
Dealing with a "PC won't go to sleep" issue can be frustrating, but with these solutions, you should be able to get your Windows 10 PC back to its normal, sleep-friendly self. Whether it's closing background programs, updating drivers with the help of PcGoGo Driver Sentry, adjusting power settings, checking for hardware problems, or troubleshooting Windows updates, there's a fix for every situation. Don't let sleep glitches disrupt your digital life any longer. Try these tips today and enjoy a more efficient and energy-saving PC!
