





Some Windows 10 users may encounter keyboard keys that stop responding, making typing and daily tasks difficult. This issue can be caused by hardware faults, driver problems, incorrect settings, or system-related glitches. In this guide, we'll provide practical solutions to fix unresponsive keyboard letters and restore normal keyboard functionality on your Windows 10 PC.
Restart the Device
Save your ongoing work and close all open applications.
Click the "Start" menu, select "Power", and then click "Restart".
After restarting, check if the keyboard is functioning normally.
Check Keyboard Hardware Connections
If using a USB keyboard, make sure the keyboard plug is securely connected. Try plugging the keyboard into a different USB port, preferably one at the back of the computer.
If using a wireless keyboard, check the battery level, ensure the receiver is properly inserted, and check for signal interference.

Try connecting the keyboard to another computer to verify if the keyboard itself is faulty. If the keyboard works fine on another device, the issue may be with the computer.
Disable Filter Keys and Sticky Keys
Press Win + U to open "Ease of Access" Settings.
In the left menu, select "Keyboard".
Check if "Use Sticky Keys" and "Use Filter Keys" are enabled. If they are, disable them.
Disable Sticky Keys: This prevents accidental key presses from being triggered.
Disable Filter Keys: Ensures that all keys can be pressed and registered normally.
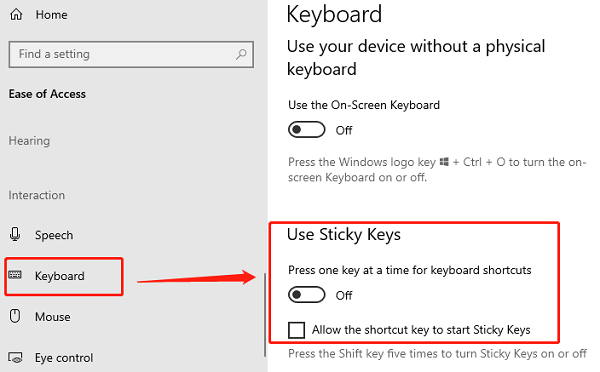
After turning off these features, try typing on the keyboard again to see if the issue is resolved.
Run Keyboard Troubleshooter
Press Win + I to open "Settings", and select "Update & Security".
In the left menu, click "Troubleshoot", then scroll down and select "Additional troubleshooters".
Find "Keyboard", click "Run the troubleshooter", and the system will automatically scan and fix keyboard-related problems.
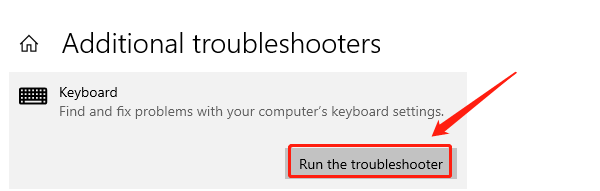
Check Keyboard Drivers
Outdated or damaged keyboard drivers are a common cause of unresponsive keys. Checking for driver updates is an effective solution to this problem. We recommend using Driver Sentry to automatically detect and update drivers, saving time and avoiding the risk of downloading or installing incorrect drivers.

Disable Fast Startup (Windows 10 Only)
Press Win + X, select "Power Options".
Click "Additional power settings", then click "Choose what the power buttons do".
Click "Change settings that are currently unavailable", then find the "Turn on fast startup (recommended)" option.
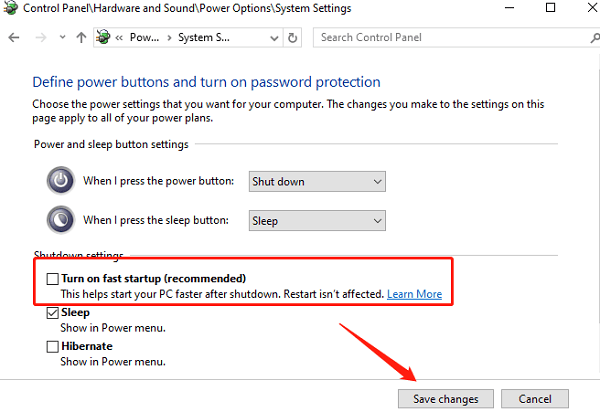
Uncheck "Turn on fast startup (recommended)", and click "Save changes".
Restart your computer and check if the keyboard works properly.
Regular Keyboard Maintenance
Turn off your computer and use compressed air to clean the keyboard, especially around the letter keys. You can also gently wipe the keyboard surface with a soft cloth and a small amount of cleaner.
Ensure the keycaps are secure and not loose or missing.
Avoid spilling liquids on the keyboard to prevent liquid from seeping in and causing key malfunctions.